Pages

Showing posts with label word. Show all posts

Friday, February 8, 2013

Graphs of Inequalities

I just finished a unit on inequalities with my Algebra 1 students, and I remember in years past struggling to find a way to include number line graphs in my quizzes, notes, and slide shows.

 Over the years I've amassed a large number of these number line graphs, of different types, and thought I'd throw them up on the blog for the one or two other math teachers who might stumble across this and want them. They are in a PowerPoint format, because I found that working with shapes and lines in PowerPoint was easier than any other program I had.  If you're interested, here's a file containing them.

They are just a series of shape objects, which I alter by adjusting their size or orientation.  Once I have the graph I want, then I select all the objects, copy them, and paste them as a picture, which I can use in PowerPoint or Word.  
One thing I am still looking for is a good source of creating two dimensional graphs. If you know of something, post it in the comments below.

Saturday, January 19, 2013

Greek Letter Shortcuts in Microsoft Word

When typing up notes, worksheets, and assignments, I often find myself needing to type some special mathematical symbols, such as π. Other Greek letters are useful too, such as Δ for change in. The lazy thing to do is just type pi, or delta, but there are a handful of ways to insert these symbols into a document.

Character Map

  • In Windows, you can find the old Character Map -- a program I've seen since I used Windows 3.1 growing up. You can find it by pressing the Windows button and searching for character map -- and then the window on the right will pop up. In it you can find a wealth of characters that you can copy onto the clipboard and paste into whatever program you're typing in. I used it to type the π and Δ symbols above.  Though this technique can work, and work for multiple programs, I don't use it often

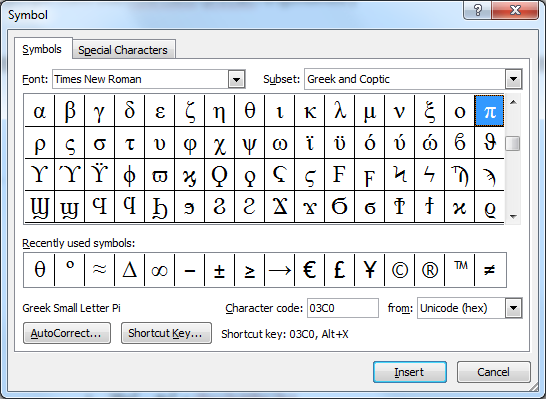
  • In Microsoft Word and PowerPoint, you can find Insert Symbol in the ribbon along the top. Like Character Map, it gives you a list of hundreds of different symbols that you can search through to use. The window looks like this:


  • If you notice the bottom of the box there is a shortcut key programmed in for the letter π. In Microsoft Word, you can use this code to enter in a π symbol without using this window -- much faster!  To use the code, type 03c0 (those are zeroes) and then hold Alt and press X.  You'll see that the 03c0 becomes a π symbol! Magic! And many other characters have a character code similar to π. My problem is that there is no way that I'll remember each of those strange character codes every two weeks or so that I need them. So I would have to look them up online and in the time it takes to do that, I could have just found it in the insert symbol box.
  • A related technique is to use an Alt code.  Hold Alt and press 227 on number pad, then let go of Alt and you'll see a π symbol appear.  Many other letters have a Alt code, but again -- how am I supposed to remember which codes are which?  And why in the world is the Alt code for π 227 and not something reasonable like 314?!
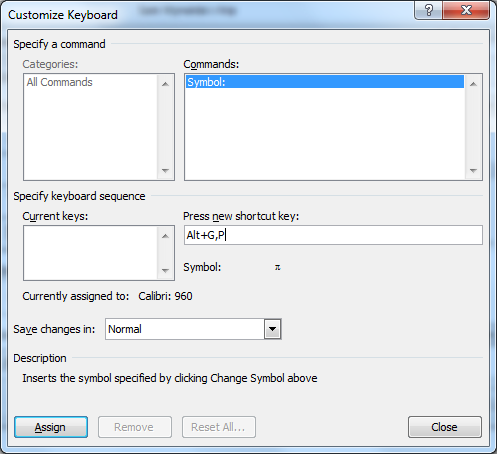
  • My favorite solution to this in Microsoft Word is to use the shortcut button to create my own keyboard shortcuts for each of the symbols I use often!  If you click on the button "Shortcut Key" it will bring up the following form:
    As you can see, I have created a keyboard shortcut that I'll remember, and stored it in Word so that when I return a few weeks later, I can find the π symbol more quickly!  For me, it made sense to type Alt G, P.  My line of reasoning is that it's a greek letter, Pi.  I have gone ahead and assigned shortcuts similar to this for all the Greek letters that I use on a regular basis:
    • Alt G, D for lowercase delta
    • Alt G, Shift-D for uppercase delta (for "Change in")
    • Alt G, A for alpha (for angles)
    • Alt G, B for beta (for angles)
    • Alt G, Q for Theta (for angles)
    • Alt G, T for Tau (torque in Physics)
    • Alt G, r for Rho (density in Physics)
    • Alt G, W for Omega (rotational velocity in Physics)
    • Alt G Shift-W for captial Omega (Ohm symbol for resistance in Physics)
    • Alt M, . for the mathematical symbol for multiplication
    • Alt M, 2 for the squared symbol
    • Alt M, 3 for the cubed symbol
    • Alt M, R for the square root symbol 
  • While on the topic, I should also mention auto-correct as an option. I remember using that quite frequently during my Spanish classes.  I made it so typing n~ and a' and such created the accents and symbols -- though if I used those characters much now I would probably create a series of Alt codes for them, perhaps with Alt S, N and Alt S, A, etc. 

Monday, January 7, 2013

Keyboard Shortcuts

While teaching some women at church how to do things in PowerPoint, I realized there are a lot of keyboard shortcuts that I use on a daily basis and take for granted. This post is just my attempt to list them all in one place. There are way more than this, and other websites may have a more complete list, but these are the ones that I use on a daily/weekly basis.

If a sibling of mine wants to do a similar thing for Mac's, I would link to it here, or eventually when I have to learn a mac, I'll write a Mac for Windows Users guide.

Windows:
   Alt-Tab - switches from program to program quickly
   Ctrl-Tab - in programs with "tabs" like internet browsers it switches tabs
   Win-Up - Makes a program maximized
   Win-Left - Makes a program take up just the left half of the screen
   Win-Right - Makes a program take up just the right half of the screen
   Win-D - Minimizes everything so you just see your desktop
   Win-Tab - Cycles through your programs like Alt-Tab, but differently
   Ctrl-MouseWheel - Zooms in or out
   PrintScreen - Takes a screen shot of the screen and stores it on the clipboard
   Alt-F4 (don't do this one now!) closes your current program
   Ctrl-F  - Finds a word or phrase on a page

   Shift-Arrows - Selects words, text, cells, slides, etc.
   Shift-Click - Selects everything from your last click till now.
   Ctrl-Click - Adds whatever you clicked to the selection
   Right-Click - Brings up a list of different options
   Right-Click and Drag - Brings up a list of options for dragging, usually move, copy, or Create-Shortcut


Microsoft Word, Excel, Powerpoint, and many other programs:
  Ctrl-X - cut
  Ctrl-C - Copy
  Ctrl-V - Paste (yes, v is paste because P is print)
  Ctrl-S - Save
  Ctrl-A - Selects (all) everything on a page or file
  Ctrl-Z - Undo!! Gets rid of the last thing you did -- like making a mistake
  Ctrl-R - Right aligns things
  Ctrl-E - Center aligns things
  Ctrl-L - Left Aligns things
  Ctrl-B - Bolds
  Ctrl-I - Italicize
  Ctrl-U - Underlines
  Ctrl-K - Makes something a hyperlink

Excel
  F9 - Recalculates all cells - useful if you have random digits in some cells

Powerpoint:
   F5 - Starts running the powerpoint
   Ctrl-F5 - Starts running the powerpoint from the current slide
   B - puts a blank slide up while running powerpoint
   Ctrl-M - creates a new slide

Monday, November 26, 2012

Mad Libs with Mail Merge

Every time I hear the song Let it Snow, Let it Snow, Let it Snow! I am reminded of an activity I did once several years ago when I used to teach computer applications. We were learning about mail merge features in Microsoft Word. We had finished an assignment on making form letters (actually, we made letters to send out to each of our family members informing them each of a different gift on our lists insuring that they each bought us something different we wanted) and had an extra day before leaving for break so I decided for the last day to try a funner use of mail merge.  So, we made Mad Libs.  Christmas Carol Mad Libs.

Acid Rain: (more info)
Students took 15 minutes or so to set up files, about 15 minutes to go from computer to computer filling out each others mad libs, and the last 15 minutes or so reading what ensued.  My favorite line -- the only one I remember actually, is:
"Let it Acid Rain! Let It Acid Rain! Let It Acid Rain!
The student had put "type of precipitation" in as a clue, and while most people put either rain, or snow, there's always that one kid that thinks a little differently.

If you're curious how to make it work, I copied and pasted my instructions down below.  These were based on the 2003 version of word, so the exact places you go to find these options have probably changed if you have the newer versions. Some of these instructions were specific to my students that year -- please forgive me if I didn't filter all of them out.


  1. Create a folder in your personal space called "madlib"
  2. Open a new Microsoft word document save it as "mymadlibsong" in that madlib folder.
  3. Find the lyrics to a christmas song of your choosing online, and paste them into "mymadlibsong".
  4. Go through your song, and remove certain keywords which you would like to be blanks that need to be filled in with words.  Delete the old word and in its place type some type a field name that you will replace it with.  e.g.  Rudolph the ADJECTIVE1-nosed ANIMAL1...  (Notice that I have a 1 after adjective, that's because each field needs a unique name -- otherwise EVERY adjective in the song would be replaced by the same word.  If I have another adjective later, I would ADJECTIVE2, etc.
  5. From Tools, choose Mail Merge...
    1. Click create main document, form letters, Active Window
    2. . Get Data, Create Data Source...
    3. Remove all the prearranged field names that Word gives you
    4.  Go through your whole story from top to bottom and add the fields that you created above.  Remember that each field name requires a unique name, which is why I have adjective1, adjective2, etc.  
    5.  Click OK and save it as "mywordlist" in madlib folder
    6. Choose "Edit Data Source"  The Data source is what MsWord calls the document which contains all the information that will be placed into the main document, or in this assignment, the data source is the wordlist, and the main document is the story.
    7. You can words if you'd like, enter at least one set of words.  If you have come up with one set of words -- called a record -- either enter another set, or have a friend or neighbor enter a set
    8. When you are finished entering words (at least for now) hit OK.
  6. Notice now the Merge toolbar has been added to your bar. The first available button is insert Merge field.  If you click on that button, you'll see your list of fields that you can place in your document in the appropriate locations.  Go through your document and replace each of the field names you typed earlier with the appropriate mergefield. It should look like <<ADJECTIVE1>>.  
  7.  When you are complete finished, press the button with <<>>ABC on it and you'll find that each of the merge fields has been filled with the lyrics that you and your friends have come up with!  Click the > button to read through each of the records you created.
  8. To make another verse. Click the MailMergeHelper button, and you'll see the familiar menu. This time click Edit Source Document.  Add another verse, either yourself, or by asking me or a different friend to fill yours out.  Before you hit ok, click View source.  You should see another word document pop up with a table containing your words -- much like an excel spreadsheet.  Both can be used.  Typically it is easier to create a file this way, but sometimes, if you already have an Excel document made up, it will be easier to use that information already. Close the source file, saving any changes you may have made, and try reading the new verses you made.
If you try it and come across any issues, comment below and I can try to help. If you try it and come up with a cool verse, comment that too!

Thursday, November 22, 2012

Word Blanks using Microsoft Word's Styles

I have notes available in Microsoft Word for my students, and one of the things I have found most helpful is creating and using styles. Styles are quick formatting options that can be used and reused from file to file.

To find Styles in Microsoft Word, press Ctrl-Shift-S. A list of available styles should come up. These are probably preset styles that come automatically. To apply a style, select some text and click on one of those styles and you will see it change.

While applying the built-in styles is kind of helpful, the real power of styles is when you adjust and control what you want styles to look like. Or when you create new styles of your own. One thing I found myself doing over and over again was creating fill in the blanks for my students in their notes. One problem I had was I would often forget what the word was myself. I found myself making two files all the time -- one which had blanks in it, and another that had the answers. This was a nightmare to manage and I found a solution with styles.

I created a new style called WordBlank. Then I typed up my "answer key" version of the notes, and as I found words that I wanted to blank out, I applied this new WordBlank style to them. When I was done typing it, I modified the WordBlank style by pressing the Modify... button.

Several formatting features made the blanks look just the way I wanted them to.

  • Set to underline.
  • Set the underline color to Black
  • Set the words to be e x p a n d e d.  This is because students handwriting takes up more space then text does, and so the blanks needed to be wider than they would naturally appear.  Alternatively you could just make the font size a little bigger than normal too, or some combination of both.

When I was done, all the words in the document that I had applied the style to looked like this:
Now I could print if I wanted to and have an answer key.

But the real genius was that in this one file, now I could modify the style and change one thing:

  • Set the font color to white


And now the file changed to this:

Then I could print off student copies!  

Now, all of my notes files have this style in them. To make that easier, I pushed "Manage Styles" and made sure to copy that style into my Normal file, so that every time I start a new word document, WordBlank is one of the options I have available.  

Also, since I have all these files available on my class website for students to download, they can access them. Since the blanks are there -- if the students are sick or absent, all they have to do to get the notes is to select the blanks and change them to a different color. And yes, I show them how to do this early on in the year.

If you want to download a document that has my wordblank style in it, try these Momentum Notes.
Related Posts Plugin for WordPress, Blogger...